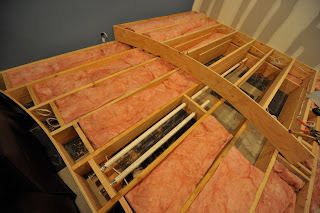
Here you can see the framing, it's going to be a two stage riser, with a neat curve to match the radius of the back of the chairs.
Next, here's the insulation going in, and accessory ports I put in using two 2" pvc pipes. You can see that I tapped an electrical outlet on the far wall to run power to the riser. It was pretty simple, I drilled a hole in the bottom of the outlet box, and put a big hole through the framing at the bottom, which is covered by the insulation. I fished a wire through there, and pulled 14/2 wiring up through there for later hookup.
Below I have the wiring going up to power a switch for the step lights. I know it's not usually to 'code' to run lighting off a circut that is deadicated to electircal outlets, but this switch will power only 3 lights of 25 watts each. I checked with a few people who know a lot more than I do about this, and they said it shouldn't be a problem.
Here's a few more angles of the riser. I'm adding these because I benefited a lot from seeing other people's in-progress creations, which gave me a lot of confidence that I could do this, so I'm returning the favor to any future riser designers/builders ..
Here are a couple of shots with the sheething on, now that the rough electrical is in place. you can see that I have four six 4-gang outlets for the 11 chairs. The top two outlets are not visible, because those outlets are flat on the floor, up by the new wall. The two square ports in the middle of the bottom riser, are actually for access to the two long pvc pipes to fish wires through.
In this photo (below) you can see the maple trim around the riser (sort of anyway):
The next post. Hmmm.. maybe Red?


I had the design in place (previous post), but I knew I would also need to figure out a few key things like electrical outlets for the chairs, wiring and a switch for the step lights, insluation, and running a few accessory ports through the riser to add accessory wiring for things like ButtKickers. Iluminaço
ReplyDeleteHi You guys did amazing job here! Can you share material you used to build this riser? Also may be dimensions and possibly step by step instructions?
ReplyDeleteThank you,
UJ
What size is your room?
ReplyDelete